This tutorial shows how to create a fur like on screenshots below, using shells technique. This technique creates a number of shells around geometry and assigns material, that simulates fur slice for each shell. This looks pretty well from a distance.


On images, there is a kind of vegetable or a mold that grows on a space station everywhere. Looks disgusting. This effect is widely used in game. It's applied for different props: Crates, armchairs, garbage and corpses. I’m happy with it. We want it to be hairy.
The image below shows shells with applied masked material on it.

I create blueprint and material to test this technique for our purposes. The blueprint creates a number of StaticMeshComponents with fur material. Basicly, the material ables to control thickness of hairs and push a geometry at specified value. Then we added tons of other settings, which help to set hair color for roots and tips, wind and many other. This technique is expensive to use. There is two good tricks, that helps to optimize this. The first one is to reduce shells count with the distance. And the second is to bake lights for those things. To doing that, every shell must be static and root component must be static too.
The Blueprint:

This blueprint creates a number of shells around specified mesh and applies proper materials and parameters. Push for every shell is made on material side. This is done by moving each vertex on vertex pass toward its normal. In order to re-create this blueprint, you need to implement following variables:
- Mesh is StaticMeshComponent. Shells are created, based on this.
- MeshMaterial is MaterialInterface. This material is used for mesh on which hairs are going to be placed.
- FurMaterial is MaterialInterface. Here you can specify a hair material.
- FurLevels it integer. It set count of shells. If this number equals to zero, only Mesh will be rendered and no fur will be generated.
- HairLength is float. It specify how long hair will be. You can find distance between shells by divide it be FurLevels.
- RootsColor is LinearColor. Sets color of hair roots.
- TipsColor is LinearColor. Sets color of hair roots. Color for middle levels is interpolated.
- RootsTickness is float. Sets size of hair roots.
- TipsTickness is float. Sets size of hair tips.
- FurCastingShadow is bool. Used to disable casting shadow for shells in order to improve performance.
- InheritWind is bool. Used to override fur vertex animation from animation specified in MeshMaterial.
- furDrawDistance is float. It’s a distance to camera on which only last shell is visible. For distance greater that that, no shells will be rendered. A number of visible shells are increased up to FurLevels, as distance becomes smaller.


The Material:

Fur_Color

As seen from it’s name, this block is used to control fur’s color.
Size control

The idea of this block is to multiply color by a diameter value and then crop the result.
Distribution

In this block you can specify a distribution texture. This map show areas, where fur grows. It able to grow this areas or shrink them.
Chaos

The most important node is chaos. This node evaluate the world offset for each level. It adds displacement from a given texture to normal direction for each vertex with specified weight. With chaos fur look more natural.
Wind

This bunch of nodes simulates wind by moving vertices.
Surface
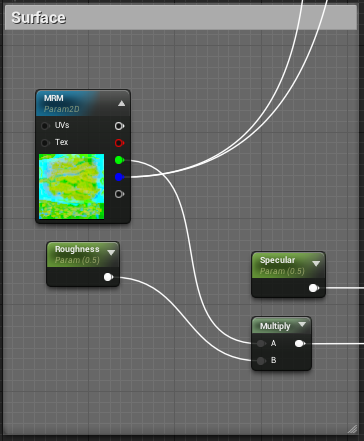
Would you kindly make a high res screenshot of the material screen? I cannot see how it fits on the result node.
ОтветитьУдалить